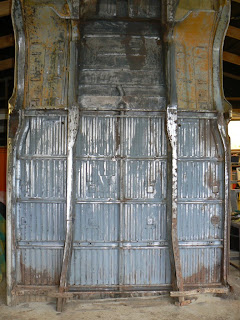
To date I have cut out the panels and given the underside of the floor a good going over with the wirebrush on the drill and a screwdriver/chisel to scrape all the underbody seal off and expose the paint. I applied a thin coat of paint stripper and scrubbed it down to remove any bad paint. Now I need to wash it down with degreaser and then paint it. With 3 weeks until we head off on our Europe trip that will probably be as much as I will get done before we go. I might start lining the three pieces up and think about where to cut them neatly to get a nice tight join - but probably won't make a start on cutting.
Wednesday, May 27, 2009
Work starts on the back section
Got some more work done over the weekend and have also been doing a bit of work at night for an hour or two most days. Started getting the end section ready for painting. This had similar reinforcing panels underneath to those I found on the front section though it only had them on the outsides not the middle (the front section had the middle part covered by a panel as well). I couldn't quite the end section fully upright as it hit the ridge beam in the garage so I had to prop it up as high as I could which makes for a bit of an awkward angle for working on it.
Sunday, May 10, 2009
Painting the underside
Finally some more pics. Did a little more work over the last couple of weeks and progressed with cleaning/tidying up the underside of the front and middle sections. I didn't quite go fully to bare metal but did strip it back more than I thought. The sections still had remnants of the original primer in places which I left so long as it was intact. I wirebrushed all the surfaces to ensure that any loose paint was removed before painting. The paint I am using is Metalfix which there are two different types. The first coat is Metalfix which can be painted directly onto rusted (but wire brushed) surfaces and it reacts - much the same as rust converter - with this rust neutralising it and bonding properly to the surface. I did a full coat of this on both sections and then overcoated them with Metalfix1000 which doesn't have the rust converter in it so is good for protecting clean (non rusted) or prepainted surfaces. This paint should be as good as POR15 from what I have read / been told and its water based so makes cleanup much easier. I did brush it on rather than spray it as thats what the recommendation is - spraying would require thinning and that is not recomended. The middle section had its final coat of black Metalfix1000 which the front section will get this week. The outer sills and main chassis rails have not been painted as they still require further work but that can't really be done until I get the pieces welded together. Once I've got the front section done I can then move onto the rear section which still needs to have its underfloor support sheets cutout similar to what the front section had and then needs to be cleaned and painted.
plan is to weld all the pieces together and then spray one or two coats of enamel paint all over underside to seal it - though Metalfix1000 can be left as final coat.
Middle section all cleaned up and ready for first coat of paint:
First coat of paint - Metalfix (still drying hence the shiny spots!)
And with all three coats on - 1 metalfix + 1 red metalfix1000 + 1 black metalfix1000
The front section ready for first coat of paint
First and second coats applied to front section - still waiting for black coat. Note that the top section (under cab floor) will not be painted until later as I need to cut out and weld in new floor sections. So will paint once all the pieces are welded together as its too hard to repair the floor 2.5m up in the air as it is at the moment! Will be much easier once I drop this section back down onto the floor!
and again close up - looks so good!! like new! :-)
Subscribe to:
Posts (Atom)